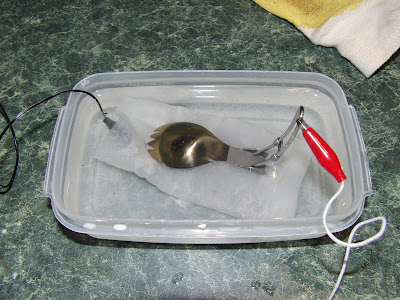
The setup is pretty simple. You have a tub filled with an electrolyte solution (I tried 5% White Vinegar, and a saturated solution of baking soda in warm water -- the baking soda works much faster and gives better results IMHO). You then hack together a couple of 9V battery clips so one of them has the black (negative) end connected to a clip, and the other has the red (positive) end connected to another clip.
In my setup, the negative size of the circuit is connected to a large metal plate (it can be any conductive metal; steel, aluminum or even titanium) wrapped in a couple of layers of paper towel. The electrolyte can soak through this, but it prevents a short circuit.
You then connect any number of 9V batteries together in a zigzag manner, and connect the two clips to the exposed ends. This gives you a source of 9V, 18V, 27V and so on. Use rubber gloves and care, because the voltages can get up there!
You then connect the red (positive) side to the item you want to anodize, drop it into the electrolyte, and wait. Bubbles will form; what is happening is that the current is breaking the water up into hydrogen and oxygen, and the oxygen travels to the positive side of the circuit and builds up an oxide layer on the titanium. The more voltage, the deeper the oxide layer gets, and different depths = different colors.
Here are some color results I got; the top row is vinegar, and the bottom row is baking soda. Baking soda is much more conductive, so you get results much more quickly (and the batteries will get warm). I also think it gives a better finished result. Even though I did my tests for 2 minutes with vinegar and one minute with baking soda, you need much less time to get to the point where the color is no longer changing.
As it happens I had some Brunton MY-TI folding sporks lying around. The bowl is made of titanium, and the wire handle is steel. So I decided to see what would happen...
The leftmost spork is untreated, the center one is the result of using 2 9V batteries (slightly used, so about 16v), and the rightmost one required 4 9V batteries (also slightly used, about 34v). Interestingly enough, the titanium stem with the Brunton logo on it has a surface treatment that greatly slows the anodizing process; you can just barely see a hint of color in the purple spork.
All in all, I think a tastefully anodized titanium spork is "an elegant utensil, for a more civilized age" -- and if you sharpen the tines, it's also a weapon!


3 comments:
Thanks for this info, pretty enlightning...
in the pic of the various rings being anodized... the last one from the bottom row, baking soda, 1 min, 54V, has no mark, almost, from the holding knipper,...
Does always happens with BS/1m/54V ?
I'm trying to find a way to avoid such marks, any ideas?
Thanks
It's very difficult to avoid the marks, except by having a very small contact area with the electrode. I try and put the electrode in an inconspicuous place -- for example, with the sporks, I used the handles as electrodes, so the contact points were inside the holes.
Thanks a lot,
i've been working a bit with it, but only with torch, so far.
Always I gave certain amount of surface texture, as seems to bring up colors. At least, 400-grit sand paper.
Check the necklace i did some time ago,the round parts are well textures, while the wires are just plain.
http://alvarjewelry.blogspot.com/2009/10/collar-azul.html
Cheers.
p.s.: i'll start with anodizer next week, we'll see...
Post a Comment